> ## Documentation Index
> Fetch the complete documentation index at: https://docs.bubblav.com/llms.txt
> Use this file to discover all available pages before exploring further.
# Custom Tools
> Connect your chatbot to any API or backend system
Custom tools extend your chatbot's capabilities by connecting it to your own APIs. Unlike built-in integrations, custom tools give you complete flexibility to integrate with any system—your CRM, inventory, pricing engine, or any external service.
## What Are Custom Tools?
A custom tool is a function that your chatbot can call to perform actions or retrieve data. You define:
1. **What** it does (description for the AI)
2. **What parameters** it needs (argument schema)
3. **Where** to send requests (your API endpoint)
4. **How** to authenticate (API key, Bearer token, or HMAC)
When a customer asks something relevant, the AI automatically calls your tool and uses the response.
## Common Use Cases
Check order status from your backend
Real-time product availability
Retrieve customer info from CRM
Custom pricing based on quantity/customer type
***
## Step-by-Step Guide: Building a Weather Tool
In this guide, we'll build a **Weather Checker** tool that allows your chatbot to answer questions about the weather in any city. We'll use the free [OpenWeatherMap API](https://openweathermap.org/api).
### Prerequisites
1. Sign up at [OpenWeatherMap](https://openweathermap.org/api) to get a free API key.
Go to **Dashboard** → **Integrations** → **Custom Tools** → **Create Tool**
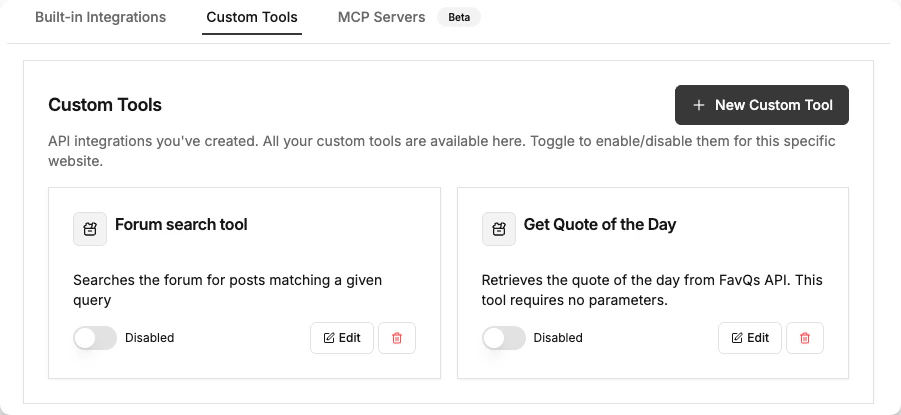
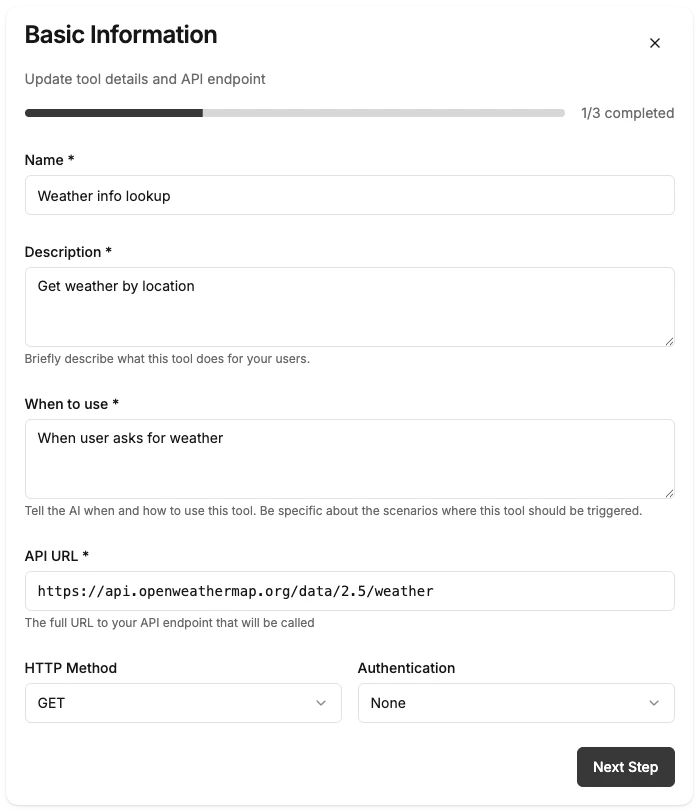
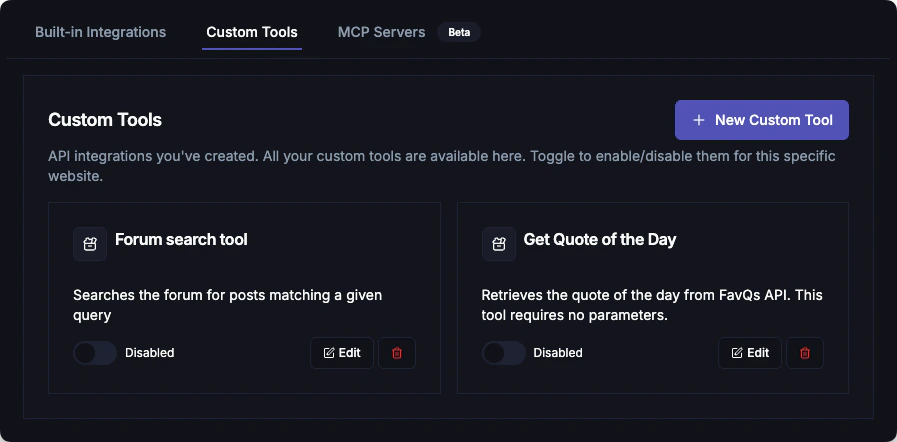 Fill in the following fields:
**Tool Name**: `get_weather`
* Must be unique, lowercase, and use underscores.
**Display Name**: `Weather Checker`
* A human-readable name for your internal dashboard.
**Description for AI**:
"Get current weather information for a location. Use when customer asks about weather, temperature, or conditions in a specific city or location."
* *Tip:* Be specific about *when* the AI should use this tool.
Fill in the following fields:
**Tool Name**: `get_weather`
* Must be unique, lowercase, and use underscores.
**Display Name**: `Weather Checker`
* A human-readable name for your internal dashboard.
**Description for AI**:
"Get current weather information for a location. Use when customer asks about weather, temperature, or conditions in a specific city or location."
* *Tip:* Be specific about *when* the AI should use this tool.
 The argument schema tells the AI what variables it needs to extract from the user's message (like the city name).
Paste this JSON schema:
```json theme={null}
{
"q": {
"type": "string",
"description": "City name or location to search (e.g., 'New York', 'London', 'Tokyo')",
"required": true
},
"appid": {
"type": "string",
"description": "OpenWeatherMap API key",
"required": false,
"default": "YOUR_OPENWEATHER_API_KEY"
}
}
```
*Replace `YOUR_OPENWEATHER_API_KEY` with the key you got from step 1.*
The argument schema tells the AI what variables it needs to extract from the user's message (like the city name).
Paste this JSON schema:
```json theme={null}
{
"q": {
"type": "string",
"description": "City name or location to search (e.g., 'New York', 'London', 'Tokyo')",
"required": true
},
"appid": {
"type": "string",
"description": "OpenWeatherMap API key",
"required": false,
"default": "YOUR_OPENWEATHER_API_KEY"
}
}
```
*Replace `YOUR_OPENWEATHER_API_KEY` with the key you got from step 1.*
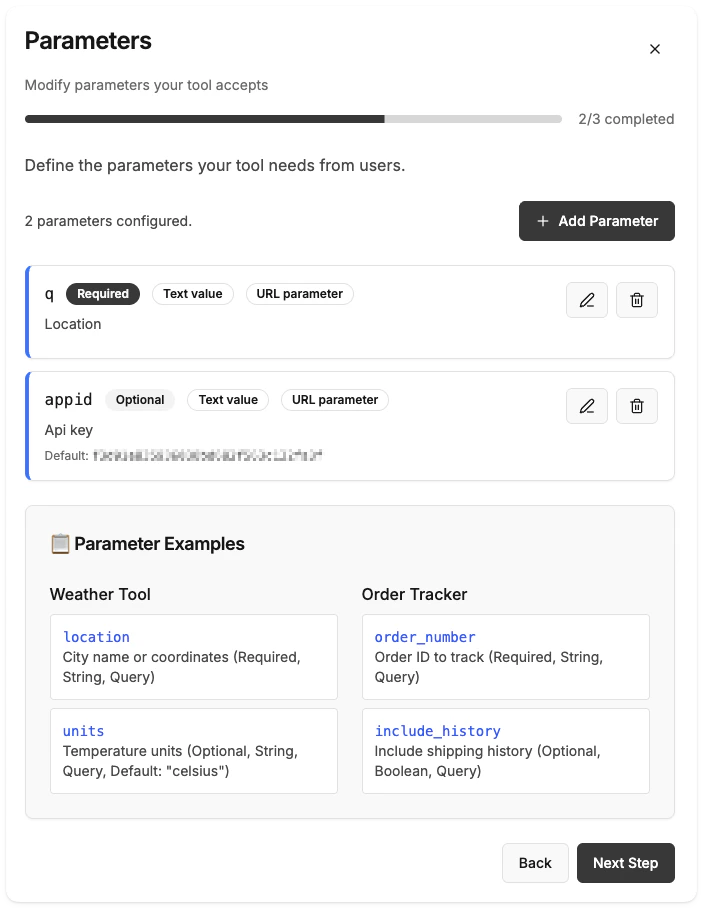
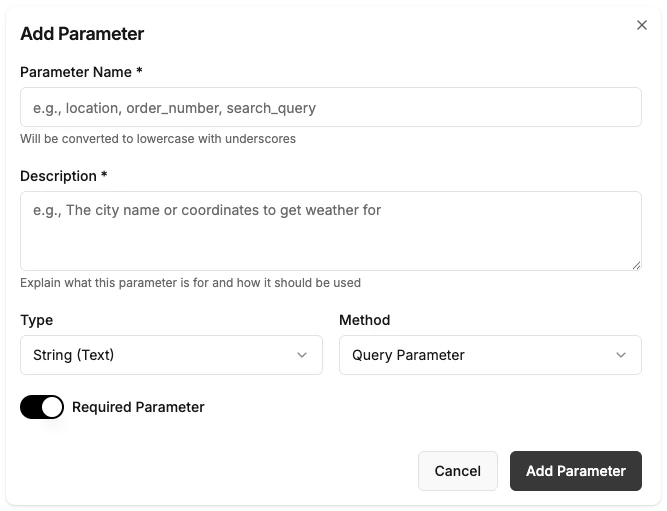
 Now map the schema arguments to the API endpoint's parameters.
1. **City Parameter:**
* Name: `q`
* Method: `Query` (URL parameter)
* Source: `q` (from schema)
2. **API Key:**
* Name: `appid`
* Method: `Query`
* Source: `appid` (from schema)
3. **Units (Static Value):**
* You can literally type `metric` as a default value if your schema allows it, or just handle it in the URL if the API supports it. For this example, we'll stick to the two dynamic parameters above.
Now map the schema arguments to the API endpoint's parameters.
1. **City Parameter:**
* Name: `q`
* Method: `Query` (URL parameter)
* Source: `q` (from schema)
2. **API Key:**
* Name: `appid`
* Method: `Query`
* Source: `appid` (from schema)
3. **Units (Static Value):**
* You can literally type `metric` as a default value if your schema allows it, or just handle it in the URL if the API supports it. For this example, we'll stick to the two dynamic parameters above.
 Enter the OpenWeatherMap API URL:
`https://api.openweathermap.org/data/2.5/weather`
* **HTTP Method**: GET
Enter the OpenWeatherMap API URL:
`https://api.openweathermap.org/data/2.5/weather`
* **HTTP Method**: GET
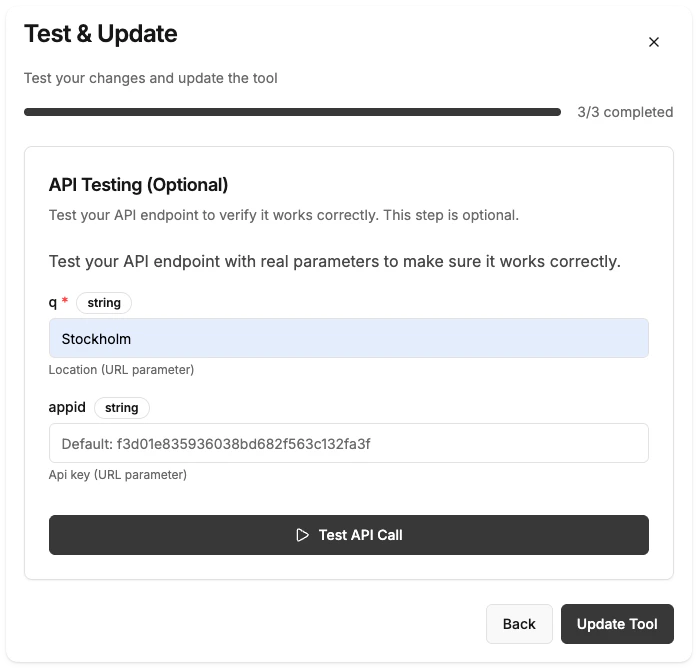
 Since we are passing the API key as a query parameter (`appid`), choose **None** for the Authentication Method in this specific case.
*For your own secure APIs, checking [Authentication Methods](#authentication-methods) below is recommended.*
1. Click **Create Tool**.
2. Click the **Test** button on your new tool.
3. Enter `London` for the `q` parameter.
4. Click **Run Test**.
You should see a successful response with temperature and weather data!
***
## Product Cards Display
When your tool returns product or item data—such as a product search, catalog lookup, or inventory check—you can enable **Product Cards** to display results as a rich visual UI instead of plain text.
### How It Works
When enabled, BubblaV automatically extracts product information from your API response (whether it returns JSON, HTML, or any other format) and renders each item as an interactive card with image, name, price, and a link to the product page. No manual field mapping is required.
Customers can:
* Browse results as cards directly in the chat
* Tap a card to see a full product detail view with image gallery
* Click **View Product** to open the product page
### Enabling Product Cards
1. Open your custom tool (create new or edit existing).
2. Navigate to the **Test & Configure** step.
3. Toggle **Show as Product Cards** on.
4. Click **Create Tool** or **Update Tool**.
The toggle is in the **Response Display** section at the bottom of the Test & Configure step.
### What Gets Extracted
The AI reads your API response and extracts the following fields wherever it finds them:
| Field | Description |
| ------------- | ------------------------------------------------------------ |
| `name` | Product title |
| `image` | Product image URL (relative URLs are resolved automatically) |
| `price` | Price as a string (e.g. `"89,000₫"` or `"$24.99"`) |
| `url` | Link to the product page |
| `description` | Short description or excerpt |
Relative image and product URLs (e.g. `/products/my-product`) are automatically resolved to full URLs using your tool's endpoint domain—no extra configuration needed.
### AI Response Behaviour
When product cards are enabled, the chatbot briefly acknowledges the search results in one sentence rather than repeating the products as a text list. The visual cards serve as the primary response.
***
When you secure your custom tool, you share a secret key between BubblaV and your API.
1. **In Dashboard**: You enter or auto-generate a **Secret Key** (e.g., `my-secret-token-123`).
2. **In Your Backend**: You adhere to the environment variable `BUBBLAV_SECRET_KEY` with that *exact same value*.
3. **The Check**: When BubblaV calls your API, your backend checks if the incoming request was signed/authorized with that same key.
### None (No Authentication)
Simplest setup—no auth headers sent.
Only use for internal testing or truly public APIs. Anyone with your URL can call your endpoint.
### Bearer Token
BubblaV sends your secret in the `Authorization` header:
```http theme={null}
POST /api/your-endpoint
Authorization: Bearer your-secret-key-here
Content-Type: application/json
```
In the examples below, `process.env.BUBBLAV_SECRET_KEY` represents the secret key you configured in the BubblaV Dashboard for this tool. You must add this key to your backend's environment variables.
**Validate in your API:**
```javascript theme={null}
app.post('/api/order-status', (req, res) => {
const authHeader = req.headers.authorization;
if (!authHeader?.startsWith('Bearer ')) {
return res.status(401).json({
success: false,
error: 'Missing authorization'
});
}
const token = authHeader.split(' ')[1];
if (token !== process.env.BUBBLAV_SECRET_KEY) {
return res.status(401).json({
success: false,
error: 'Invalid token'
});
}
// Process request...
});
```
```python theme={null}
from flask import Flask, request, jsonify
import os
app = Flask(__name__)
@app.route('/api/order-status', methods=['POST'])
def order_status():
auth_header = request.headers.get('Authorization')
# Check for Bearer token
if not auth_header or not auth_header.startswith('Bearer '):
return jsonify({
'success': False,
'error': 'Missing authorization'
}), 401
token = auth_header.split(' ')[1]
# Verify against your environment variable
if token != os.environ.get('BUBBLAV_SECRET_KEY'):
return jsonify({
'success': False,
'error': 'Invalid token'
}), 401
# Process request...
return jsonify({ 'success': True, 'data': { 'status': 'shipped' } })
```
### HMAC Signature (Recommended)
Most secure option using cryptographic signatures. Prevents replay attacks and ensures request authenticity.
**Headers sent:**
```http theme={null}
POST /api/your-endpoint
Content-Type: application/json
X-BubblaV-Signature: sha256=abc123def456...
X-BubblaV-Timestamp: 1703123456789
```
In these examples, `process.env.SECRET` refers to the **HMAC Secret Key** you generated in the dashboard. Ensure this environment variable matches the key in your tool configuration.
**Validate in your API:**
```javascript theme={null}
const crypto = require('crypto');
function verifySignature(body, signature, secret, timestamp) {
const payload = `${timestamp}.${JSON.stringify(body)}`;
const expected = crypto
.createHmac('sha256', secret)
.update(payload, 'utf8')
.digest('hex');
return crypto.timingSafeEqual(
Buffer.from(signature, 'hex'),
Buffer.from(expected, 'hex')
);
}
app.post('/api/secure-endpoint', (req, res) => {
const signature = req.headers['x-bubblav-signature']?.replace('sha256=', '');
const timestamp = req.headers['x-bubblav-timestamp'];
// Check timestamp (5 min tolerance)
const now = Math.floor(Date.now() / 1000);
if (now - parseInt(timestamp) / 1000 > 300) {
return res.status(401).json({
success: false,
error: 'Request expired'
});
}
if (!verifySignature(req.body, signature, process.env.SECRET, timestamp)) {
return res.status(401).json({
success: false,
error: 'Invalid signature'
});
}
// Process authenticated request...
});
```
```python theme={null}
import hmac
import hashlib
import time
import json
import os
from flask import Flask, request, jsonify
app = Flask(__name__)
def verify_signature(body, signature, secret, timestamp):
# Create the payload string exactly as BubblaV does: timestamp + . + json_body
# Note: separators=(',', ':') ensures standard JSON formatting without whitespace
payload = f"{timestamp}.{json.dumps(body, separators=(',', ':'))}"
expected = hmac.new(
secret.encode('utf-8'),
payload.encode('utf-8'),
hashlib.sha256
).hexdigest()
return hmac.compare_digest(signature, expected)
@app.route('/api/secure-endpoint', methods=['POST'])
def secure_endpoint():
# Get headers
signature = request.headers.get('X-BubblaV-Signature', '').replace('sha256=', '')
timestamp = request.headers.get('X-BubblaV-Timestamp')
if not timestamp or not signature:
return jsonify({'success': False, 'error': 'Missing signature headers'}), 401
# Check timestamp (5 min tolerance) to prevent replay attacks
if time.time() - int(timestamp) / 1000 > 300:
return jsonify({'success': False, 'error': 'Request expired'}), 401
# Verify signature
if not verify_signature(request.json, signature, os.environ['SECRET'], timestamp):
return jsonify({'success': False, 'error': 'Invalid signature'}), 401
# Process authenticated request...
return jsonify({'success': True, 'message': 'Verified!'})
```
### Testing HMAC Signatures
Validating signatures can be tricky. Use our built-in debug tools to help:
**Dashboard Debug Info**: In the **Testing** step of the Custom Tool Wizard, look for the **Request Details (Debug Info)** section. It shows you the exact **Payload String** we used to generate the signature. You can use this to debug your own verification code.
***
### Key Requirements & Security
When generating or providing your own keys, follow these security best practices:
**General Requirements:**
* **Length:** Minimum 32 characters (longer is better)
* **Complexity:** Use a mix of letters (upper/lowercase), numbers, and symbols
* **Entropy:** Avoid common words, repeated characters (e.g., "aaaaa"), or sequential patterns (e.g., "123456")
**Specific Guidelines:**
* **Bearer Tokens:** Must be URL-safe (no spaces or special characters).
* *Example:* `A4B8C12D16F20G24H28I32J36K40L44M48`
* **HMAC Secrets:** Recommended minimum 64 characters for cryptographic security.
* *Example:* `abcd1234efgh5678ijkl9012mnop3456qrst7890uvwx...`
**Security Note:** These keys are used to authenticate API requests. Store them securely and never share them publicly. If a key is compromised, regenerate it immediately.
**Using Existing Keys:** If you choose to use an existing API token or secret key, ensure it is properly configured on your endpoint to accept requests from BubblaV.
***
## Request & Response Format
### Request from BubblaV
Your endpoint receives POST requests with this JSON body:
```json theme={null}
{
"tool_name": "get_order_status",
"arguments": {
"order_number": "ORD-12345",
"include_items": true
},
"timestamp": 1703123456789,
"user_id": "uuid-of-website-owner"
}
```
### Response to BubblaV
Return JSON in this format:
```json theme={null}
{
"success": true,
"data": {
"order_number": "ORD-12345",
"status": "shipped",
"tracking": "1Z999AA123456789",
"estimated_delivery": "2024-01-15",
"items": [
{ "name": "Blue T-Shirt", "quantity": 2 }
]
},
"message": "Order ORD-12345 has shipped and will arrive by January 15th."
}
```
```json theme={null}
{
"success": false,
"error": "Order not found: ORD-99999",
"data": null
}
```
The `message` field is what the AI will use to respond to the customer. Make it friendly and informative!
***
***
## Example: Discourse Forum Search
Here's how to connect to a Discourse forum to search for topics.
### 1. Tool Configuration
| Field | Value |
| ------------ | ----------------------------------------------------------------------------------------------------------------- |
| Tool Name | `forum_search` |
| Display Name | Community Forum Search |
| Description | Search the community forum for topics. Use when answering technical questions or looking for community solutions. |
| Endpoint URL | `https://community.yourdomain.com/search.json` |
| Auth Method | None (Public API) |
### 2. Argument Schema
```json theme={null}
{
"q": {
"type": "string",
"description": "The search query to find relevant topics",
"required": true
}
}
```
### 3. Parameters
* **q**: Add as a query parameter (Method: `query`)
### 4. Advanced: Two-Step Workflow
For better results, often you want to search first, then fetch the full topic details.
1. **Create `forum_search` tool**: Returns a list of topics.
2. **Create `forum_topic_detail` tool**:
* URL: `https://community.yourdomain.com/t/{topic_id}.json?print=true`
* Params: `topic_id` (Path parameter)
**AI Instructions**:
"First use `forum_search` to find relevant topics. Then use `forum_topic_detail` with the best matching topic ID to get the full answer."
***
### In Dashboard
1. Go to **Integrations** → **Custom Tools**
2. Find your tool and click **Test**
3. Enter sample arguments
4. Click **Run Test**
5. Verify the response looks correct
### Live Testing
1. Open your website with the chatbot
2. Ask questions that should trigger your tool:
* "What's the weather in New York?"
* "How's the weather in London?"
* "Check weather for Tokyo"
***
## Troubleshooting
* Make your Description for AI more specific
* Include trigger words customers use
* Verify tool is marked as Active
* Verify secret key is correct
* Check endpoint receives expected headers
* For HMAC, verify timestamp and signature calculation
* Ensure endpoint responds within 10 seconds
* Optimize database queries
* Check network connectivity
* Return valid JSON with `success`, `data`, `message` fields
* Check for syntax errors in JSON
* Test endpoint with curl or Postman first
***
## Best Practices
Each tool should do one thing well
Help AI understand when to use each tool
Aim for sub-second response times
Return user-friendly message text
***
## Next Steps
Hand off conversations to live agents
Enable real-time web search
See all available integrations
Since we are passing the API key as a query parameter (`appid`), choose **None** for the Authentication Method in this specific case.
*For your own secure APIs, checking [Authentication Methods](#authentication-methods) below is recommended.*
1. Click **Create Tool**.
2. Click the **Test** button on your new tool.
3. Enter `London` for the `q` parameter.
4. Click **Run Test**.
You should see a successful response with temperature and weather data!
***
## Product Cards Display
When your tool returns product or item data—such as a product search, catalog lookup, or inventory check—you can enable **Product Cards** to display results as a rich visual UI instead of plain text.
### How It Works
When enabled, BubblaV automatically extracts product information from your API response (whether it returns JSON, HTML, or any other format) and renders each item as an interactive card with image, name, price, and a link to the product page. No manual field mapping is required.
Customers can:
* Browse results as cards directly in the chat
* Tap a card to see a full product detail view with image gallery
* Click **View Product** to open the product page
### Enabling Product Cards
1. Open your custom tool (create new or edit existing).
2. Navigate to the **Test & Configure** step.
3. Toggle **Show as Product Cards** on.
4. Click **Create Tool** or **Update Tool**.
The toggle is in the **Response Display** section at the bottom of the Test & Configure step.
### What Gets Extracted
The AI reads your API response and extracts the following fields wherever it finds them:
| Field | Description |
| ------------- | ------------------------------------------------------------ |
| `name` | Product title |
| `image` | Product image URL (relative URLs are resolved automatically) |
| `price` | Price as a string (e.g. `"89,000₫"` or `"$24.99"`) |
| `url` | Link to the product page |
| `description` | Short description or excerpt |
Relative image and product URLs (e.g. `/products/my-product`) are automatically resolved to full URLs using your tool's endpoint domain—no extra configuration needed.
### AI Response Behaviour
When product cards are enabled, the chatbot briefly acknowledges the search results in one sentence rather than repeating the products as a text list. The visual cards serve as the primary response.
***
When you secure your custom tool, you share a secret key between BubblaV and your API.
1. **In Dashboard**: You enter or auto-generate a **Secret Key** (e.g., `my-secret-token-123`).
2. **In Your Backend**: You adhere to the environment variable `BUBBLAV_SECRET_KEY` with that *exact same value*.
3. **The Check**: When BubblaV calls your API, your backend checks if the incoming request was signed/authorized with that same key.
### None (No Authentication)
Simplest setup—no auth headers sent.
Only use for internal testing or truly public APIs. Anyone with your URL can call your endpoint.
### Bearer Token
BubblaV sends your secret in the `Authorization` header:
```http theme={null}
POST /api/your-endpoint
Authorization: Bearer your-secret-key-here
Content-Type: application/json
```
In the examples below, `process.env.BUBBLAV_SECRET_KEY` represents the secret key you configured in the BubblaV Dashboard for this tool. You must add this key to your backend's environment variables.
**Validate in your API:**
```javascript theme={null}
app.post('/api/order-status', (req, res) => {
const authHeader = req.headers.authorization;
if (!authHeader?.startsWith('Bearer ')) {
return res.status(401).json({
success: false,
error: 'Missing authorization'
});
}
const token = authHeader.split(' ')[1];
if (token !== process.env.BUBBLAV_SECRET_KEY) {
return res.status(401).json({
success: false,
error: 'Invalid token'
});
}
// Process request...
});
```
```python theme={null}
from flask import Flask, request, jsonify
import os
app = Flask(__name__)
@app.route('/api/order-status', methods=['POST'])
def order_status():
auth_header = request.headers.get('Authorization')
# Check for Bearer token
if not auth_header or not auth_header.startswith('Bearer '):
return jsonify({
'success': False,
'error': 'Missing authorization'
}), 401
token = auth_header.split(' ')[1]
# Verify against your environment variable
if token != os.environ.get('BUBBLAV_SECRET_KEY'):
return jsonify({
'success': False,
'error': 'Invalid token'
}), 401
# Process request...
return jsonify({ 'success': True, 'data': { 'status': 'shipped' } })
```
### HMAC Signature (Recommended)
Most secure option using cryptographic signatures. Prevents replay attacks and ensures request authenticity.
**Headers sent:**
```http theme={null}
POST /api/your-endpoint
Content-Type: application/json
X-BubblaV-Signature: sha256=abc123def456...
X-BubblaV-Timestamp: 1703123456789
```
In these examples, `process.env.SECRET` refers to the **HMAC Secret Key** you generated in the dashboard. Ensure this environment variable matches the key in your tool configuration.
**Validate in your API:**
```javascript theme={null}
const crypto = require('crypto');
function verifySignature(body, signature, secret, timestamp) {
const payload = `${timestamp}.${JSON.stringify(body)}`;
const expected = crypto
.createHmac('sha256', secret)
.update(payload, 'utf8')
.digest('hex');
return crypto.timingSafeEqual(
Buffer.from(signature, 'hex'),
Buffer.from(expected, 'hex')
);
}
app.post('/api/secure-endpoint', (req, res) => {
const signature = req.headers['x-bubblav-signature']?.replace('sha256=', '');
const timestamp = req.headers['x-bubblav-timestamp'];
// Check timestamp (5 min tolerance)
const now = Math.floor(Date.now() / 1000);
if (now - parseInt(timestamp) / 1000 > 300) {
return res.status(401).json({
success: false,
error: 'Request expired'
});
}
if (!verifySignature(req.body, signature, process.env.SECRET, timestamp)) {
return res.status(401).json({
success: false,
error: 'Invalid signature'
});
}
// Process authenticated request...
});
```
```python theme={null}
import hmac
import hashlib
import time
import json
import os
from flask import Flask, request, jsonify
app = Flask(__name__)
def verify_signature(body, signature, secret, timestamp):
# Create the payload string exactly as BubblaV does: timestamp + . + json_body
# Note: separators=(',', ':') ensures standard JSON formatting without whitespace
payload = f"{timestamp}.{json.dumps(body, separators=(',', ':'))}"
expected = hmac.new(
secret.encode('utf-8'),
payload.encode('utf-8'),
hashlib.sha256
).hexdigest()
return hmac.compare_digest(signature, expected)
@app.route('/api/secure-endpoint', methods=['POST'])
def secure_endpoint():
# Get headers
signature = request.headers.get('X-BubblaV-Signature', '').replace('sha256=', '')
timestamp = request.headers.get('X-BubblaV-Timestamp')
if not timestamp or not signature:
return jsonify({'success': False, 'error': 'Missing signature headers'}), 401
# Check timestamp (5 min tolerance) to prevent replay attacks
if time.time() - int(timestamp) / 1000 > 300:
return jsonify({'success': False, 'error': 'Request expired'}), 401
# Verify signature
if not verify_signature(request.json, signature, os.environ['SECRET'], timestamp):
return jsonify({'success': False, 'error': 'Invalid signature'}), 401
# Process authenticated request...
return jsonify({'success': True, 'message': 'Verified!'})
```
### Testing HMAC Signatures
Validating signatures can be tricky. Use our built-in debug tools to help:
**Dashboard Debug Info**: In the **Testing** step of the Custom Tool Wizard, look for the **Request Details (Debug Info)** section. It shows you the exact **Payload String** we used to generate the signature. You can use this to debug your own verification code.
***
### Key Requirements & Security
When generating or providing your own keys, follow these security best practices:
**General Requirements:**
* **Length:** Minimum 32 characters (longer is better)
* **Complexity:** Use a mix of letters (upper/lowercase), numbers, and symbols
* **Entropy:** Avoid common words, repeated characters (e.g., "aaaaa"), or sequential patterns (e.g., "123456")
**Specific Guidelines:**
* **Bearer Tokens:** Must be URL-safe (no spaces or special characters).
* *Example:* `A4B8C12D16F20G24H28I32J36K40L44M48`
* **HMAC Secrets:** Recommended minimum 64 characters for cryptographic security.
* *Example:* `abcd1234efgh5678ijkl9012mnop3456qrst7890uvwx...`
**Security Note:** These keys are used to authenticate API requests. Store them securely and never share them publicly. If a key is compromised, regenerate it immediately.
**Using Existing Keys:** If you choose to use an existing API token or secret key, ensure it is properly configured on your endpoint to accept requests from BubblaV.
***
## Request & Response Format
### Request from BubblaV
Your endpoint receives POST requests with this JSON body:
```json theme={null}
{
"tool_name": "get_order_status",
"arguments": {
"order_number": "ORD-12345",
"include_items": true
},
"timestamp": 1703123456789,
"user_id": "uuid-of-website-owner"
}
```
### Response to BubblaV
Return JSON in this format:
```json theme={null}
{
"success": true,
"data": {
"order_number": "ORD-12345",
"status": "shipped",
"tracking": "1Z999AA123456789",
"estimated_delivery": "2024-01-15",
"items": [
{ "name": "Blue T-Shirt", "quantity": 2 }
]
},
"message": "Order ORD-12345 has shipped and will arrive by January 15th."
}
```
```json theme={null}
{
"success": false,
"error": "Order not found: ORD-99999",
"data": null
}
```
The `message` field is what the AI will use to respond to the customer. Make it friendly and informative!
***
***
## Example: Discourse Forum Search
Here's how to connect to a Discourse forum to search for topics.
### 1. Tool Configuration
| Field | Value |
| ------------ | ----------------------------------------------------------------------------------------------------------------- |
| Tool Name | `forum_search` |
| Display Name | Community Forum Search |
| Description | Search the community forum for topics. Use when answering technical questions or looking for community solutions. |
| Endpoint URL | `https://community.yourdomain.com/search.json` |
| Auth Method | None (Public API) |
### 2. Argument Schema
```json theme={null}
{
"q": {
"type": "string",
"description": "The search query to find relevant topics",
"required": true
}
}
```
### 3. Parameters
* **q**: Add as a query parameter (Method: `query`)
### 4. Advanced: Two-Step Workflow
For better results, often you want to search first, then fetch the full topic details.
1. **Create `forum_search` tool**: Returns a list of topics.
2. **Create `forum_topic_detail` tool**:
* URL: `https://community.yourdomain.com/t/{topic_id}.json?print=true`
* Params: `topic_id` (Path parameter)
**AI Instructions**:
"First use `forum_search` to find relevant topics. Then use `forum_topic_detail` with the best matching topic ID to get the full answer."
***
### In Dashboard
1. Go to **Integrations** → **Custom Tools**
2. Find your tool and click **Test**
3. Enter sample arguments
4. Click **Run Test**
5. Verify the response looks correct
### Live Testing
1. Open your website with the chatbot
2. Ask questions that should trigger your tool:
* "What's the weather in New York?"
* "How's the weather in London?"
* "Check weather for Tokyo"
***
## Troubleshooting
* Make your Description for AI more specific
* Include trigger words customers use
* Verify tool is marked as Active
* Verify secret key is correct
* Check endpoint receives expected headers
* For HMAC, verify timestamp and signature calculation
* Ensure endpoint responds within 10 seconds
* Optimize database queries
* Check network connectivity
* Return valid JSON with `success`, `data`, `message` fields
* Check for syntax errors in JSON
* Test endpoint with curl or Postman first
***
## Best Practices
Each tool should do one thing well
Help AI understand when to use each tool
Aim for sub-second response times
Return user-friendly message text
***
## Next Steps
Hand off conversations to live agents
Enable real-time web search
See all available integrations