> ## Documentation Index
> Fetch the complete documentation index at: https://docs.bubblav.com/llms.txt
> Use this file to discover all available pages before exploring further.
# Haravan
> Add your AI chatbot to Haravan stores with one-click installation—no coding required
Connect your Haravan store to BubblaV and instantly deploy an AI-powered chatbot that provides 24/7 customer support—all without touching a single line of code.
## Why Connect Haravan?
No coding required. Simply authorize and the chatbot is automatically added to your store.
Go from zero to live chatbot in under 2 minutes
Chatbot updates automatically whenever you change your settings in the dashboard
Provide instant answers to your customers around the clock
## Prerequisites
* Active Haravan store
* Store owner or admin permissions
## Setup Steps
Installing BubblaV on your Haravan store is quick and simple with OAuth authorization.
Go to the [BubblaV Haravan App listing](https://apps.haravan.com/products/bubblav) and click **Install app**.
You'll be redirected to the Haravan authorization page. Review the permissions requested and click **Yes** to approve the installation.
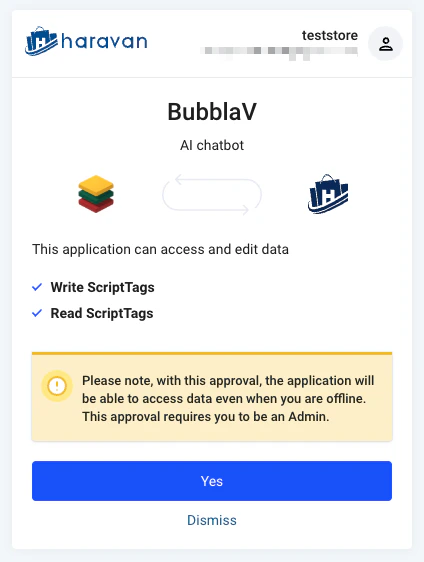 This dialog confirms that BubblaV will be granted permission to add the chatbot to your store.
After clicking **Yes**, you'll be redirected back to your BubblaV dashboard. The Haravan card should now show **Connected**, and your chatbot is live on your store.
**No Code Changes Needed**: The integration automatically injects the chatbot script into your Haravan store. You don't need to edit any theme files or add code manually.
***
## Test Your Integration
Visit your Haravan store and open the chatbot widget. Try asking a question based on your knowledge base settings:
* "What are your business hours?"
* "How do I contact support?"
* "What's your return policy?"
## Troubleshooting
* Ensure you have store admin permissions
* Clear browser cache and try again
* Verify your store URL is correct
* Wait a few minutes for the script injection to complete
* Clear your browser cache and reload the store page
* Check that the connection status shows **Connected** in your dashboard
* Wait a few minutes for the script injection to complete
* Clear your browser cache and reload the store page
* Check that the connection status shows **Connected** in your dashboard
**Security**: We only request the minimum permissions needed to add the chatbot to your store. Your store data remains secure.
This dialog confirms that BubblaV will be granted permission to add the chatbot to your store.
After clicking **Yes**, you'll be redirected back to your BubblaV dashboard. The Haravan card should now show **Connected**, and your chatbot is live on your store.
**No Code Changes Needed**: The integration automatically injects the chatbot script into your Haravan store. You don't need to edit any theme files or add code manually.
***
## Test Your Integration
Visit your Haravan store and open the chatbot widget. Try asking a question based on your knowledge base settings:
* "What are your business hours?"
* "How do I contact support?"
* "What's your return policy?"
## Troubleshooting
* Ensure you have store admin permissions
* Clear browser cache and try again
* Verify your store URL is correct
* Wait a few minutes for the script injection to complete
* Clear your browser cache and reload the store page
* Check that the connection status shows **Connected** in your dashboard
* Wait a few minutes for the script injection to complete
* Clear your browser cache and reload the store page
* Check that the connection status shows **Connected** in your dashboard
**Security**: We only request the minimum permissions needed to add the chatbot to your store. Your store data remains secure.