> ## Documentation Index
> Fetch the complete documentation index at: https://docs.bubblav.com/llms.txt
> Use this file to discover all available pages before exploring further.
# HubSpot
> Sync conversations and contacts to your CRM
Sync your chatbot conversations, contacts and leads directly to HubSpot CRM.
## Why Connect HubSpot?
* **Lead Capture**: Automatically create contacts as soon as email is collected.
* **Conversation Logging**: Save chat transcripts to the contact's timeline.
* **Visitor Insights**: Support agents see CRM properties and contact history in real-time.
* **Page View Tracking**: See which pages visitors viewed before chatting.
## Visitor Insights for Support Agents
The HubSpot integration enriches the **Visitor Insight** panel in your BubblaV dashboard, giving support and sales agents critical context from your CRM:
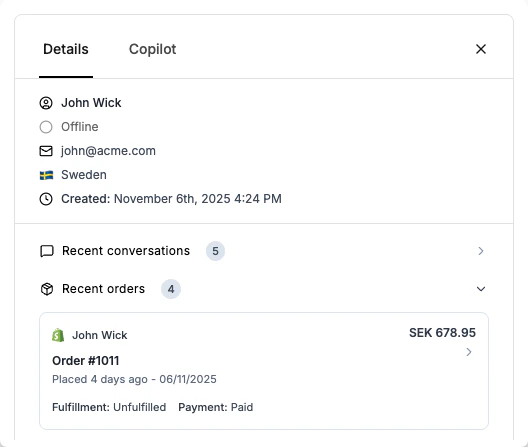 * **Contact Properties**: View HubSpot contact properties like Lifecycle Stage, Lead Status, and Owner directly in the chat.
* **Activity Timeline**: See recent events such as emails, notes, and meetings to understand the customer's history.
* **Page View Tracking**: Review a history of the specific pages and URLs the visitor has viewed on your site.
* **Deal Status**: Monitor any active or closed deals associated with the contact to prioritize high-value interactions.
Based on these insights, agents can provide a more personalized and professional support experience with the full CRM context at their fingertips.
## Setup Steps
Go to **Dashboard** → **Integrations** → **HubSpot**
Click **Connect HubSpot**. You will be redirected to HubSpot's OAuth page.
Choose the HubSpot account you want to link and grant permissions.
Once redirected back, you'll see your HubSpot Portal ID and connection status.
***
## Configuration After Connection
After successfully connecting HubSpot, you can configure how contacts are synced, which workflows are triggered, and how conversations are logged.
### Lead & Contact Sync
Configure how new contacts are created and managed in HubSpot:
**Sync Lead**
* Automatically create a contact in HubSpot as soon as the visitor provides their email address in the chat.
* **Default**: Enabled
* **Location**: In HubSpot integration settings → **Sync Lead**
**Lifecycle Stage for New Contacts**
* The HubSpot lifecycle stage applied when a visitor first shares their email
* **Default**: `lead`
* **Examples**: `lead`, `subscriber`, `opportunity`, `customer`
* **Location**: In HubSpot integration settings → **Contact sync defaults**
**Lifecycle Stage After Escalation**
* The lifecycle stage applied when a live-support escalation is created
* **Default**: `opportunity`
* **Purpose**: Helps sales teams pick up escalated conversations immediately
* **Location**: In HubSpot integration settings → **Contact sync defaults**
**Default HubSpot Owner**
* Optional HubSpot owner ID to assign new contacts
* **Default**: Unassigned (leave blank)
* **How to find**: Use the HubSpot Owners API (`GET https://api.hubapi.com/crm/v3/owners`) to look up owner IDs
* **Location**: In HubSpot integration settings → **Contact sync defaults**
### Workflow Triggers
Automatically enroll contacts into HubSpot workflows when specific intents or tags are detected in chat transcripts.
**To configure workflow triggers:**
1. Go to **Dashboard** → **Integrations** → **HubSpot**
2. Navigate to the **Workflow Triggers** section
3. Add rules with:
* **Match Type**: Choose `tag` (conversation tag) or `intent` (detected intent)
* **Value**: The tag or intent value to match (e.g., `sales-qualified`, `support-request`)
* **Workflow ID**: The internal HubSpot workflow ID to trigger
4. Click **Add rule** for each workflow you want to configure
5. Click **Save HubSpot settings**
**Example:**
* **Match Type**: `tag`
* **Value**: `sales-qualified`
* **Workflow ID**: `12345678`
* **Result**: When a conversation is tagged with `sales-qualified`, the contact is automatically enrolled in workflow `12345678`
### Timeline Logging
Control whether chat transcripts are logged as notes in HubSpot.
**Log Transcripts as HubSpot Notes**
* **Default**: Enabled
* **What it does**: Attaches the latest conversation snippet to the contact record in HubSpot
* **Additional**: Notes are also associated with HubSpot tickets when available
* **Location**: In HubSpot integration settings → **Timeline logging**
Timeline logging keeps your sales and support teams informed about customer interactions, ensuring seamless handoffs between chatbot and human agents.
### Save Configuration
After configuring all settings:
1. Review your Contact Sync, Workflow Triggers, and Timeline Logging settings
2. Click **Save HubSpot settings** to apply the configuration
3. Test by having a conversation that should trigger your configured workflows
***
## Features
* **New Contact Creation**: When a visitor provides their email in chat, a contact is created in HubSpot.
* **Timeline Events**: Chat sessions are logged as custom timeline events.
* **Property Sync**: Basic info (Name, Email) is synced automatically.
* **Contact Properties**: View HubSpot contact properties like Lifecycle Stage, Lead Status, and Owner directly in the chat.
* **Activity Timeline**: See recent events such as emails, notes, and meetings to understand the customer's history.
* **Page View Tracking**: Review a history of the specific pages and URLs the visitor has viewed on your site.
* **Deal Status**: Monitor any active or closed deals associated with the contact to prioritize high-value interactions.
Based on these insights, agents can provide a more personalized and professional support experience with the full CRM context at their fingertips.
## Setup Steps
Go to **Dashboard** → **Integrations** → **HubSpot**
Click **Connect HubSpot**. You will be redirected to HubSpot's OAuth page.
Choose the HubSpot account you want to link and grant permissions.
Once redirected back, you'll see your HubSpot Portal ID and connection status.
***
## Configuration After Connection
After successfully connecting HubSpot, you can configure how contacts are synced, which workflows are triggered, and how conversations are logged.
### Lead & Contact Sync
Configure how new contacts are created and managed in HubSpot:
**Sync Lead**
* Automatically create a contact in HubSpot as soon as the visitor provides their email address in the chat.
* **Default**: Enabled
* **Location**: In HubSpot integration settings → **Sync Lead**
**Lifecycle Stage for New Contacts**
* The HubSpot lifecycle stage applied when a visitor first shares their email
* **Default**: `lead`
* **Examples**: `lead`, `subscriber`, `opportunity`, `customer`
* **Location**: In HubSpot integration settings → **Contact sync defaults**
**Lifecycle Stage After Escalation**
* The lifecycle stage applied when a live-support escalation is created
* **Default**: `opportunity`
* **Purpose**: Helps sales teams pick up escalated conversations immediately
* **Location**: In HubSpot integration settings → **Contact sync defaults**
**Default HubSpot Owner**
* Optional HubSpot owner ID to assign new contacts
* **Default**: Unassigned (leave blank)
* **How to find**: Use the HubSpot Owners API (`GET https://api.hubapi.com/crm/v3/owners`) to look up owner IDs
* **Location**: In HubSpot integration settings → **Contact sync defaults**
### Workflow Triggers
Automatically enroll contacts into HubSpot workflows when specific intents or tags are detected in chat transcripts.
**To configure workflow triggers:**
1. Go to **Dashboard** → **Integrations** → **HubSpot**
2. Navigate to the **Workflow Triggers** section
3. Add rules with:
* **Match Type**: Choose `tag` (conversation tag) or `intent` (detected intent)
* **Value**: The tag or intent value to match (e.g., `sales-qualified`, `support-request`)
* **Workflow ID**: The internal HubSpot workflow ID to trigger
4. Click **Add rule** for each workflow you want to configure
5. Click **Save HubSpot settings**
**Example:**
* **Match Type**: `tag`
* **Value**: `sales-qualified`
* **Workflow ID**: `12345678`
* **Result**: When a conversation is tagged with `sales-qualified`, the contact is automatically enrolled in workflow `12345678`
### Timeline Logging
Control whether chat transcripts are logged as notes in HubSpot.
**Log Transcripts as HubSpot Notes**
* **Default**: Enabled
* **What it does**: Attaches the latest conversation snippet to the contact record in HubSpot
* **Additional**: Notes are also associated with HubSpot tickets when available
* **Location**: In HubSpot integration settings → **Timeline logging**
Timeline logging keeps your sales and support teams informed about customer interactions, ensuring seamless handoffs between chatbot and human agents.
### Save Configuration
After configuring all settings:
1. Review your Contact Sync, Workflow Triggers, and Timeline Logging settings
2. Click **Save HubSpot settings** to apply the configuration
3. Test by having a conversation that should trigger your configured workflows
***
## Features
* **New Contact Creation**: When a visitor provides their email in chat, a contact is created in HubSpot.
* **Timeline Events**: Chat sessions are logged as custom timeline events.
* **Property Sync**: Basic info (Name, Email) is synced automatically.