> ## Documentation Index
> Fetch the complete documentation index at: https://docs.bubblav.com/llms.txt
> Use this file to discover all available pages before exploring further.
# Zapier
> Connect BubblaV to 7000+ apps with automated workflows
## Overview
The Zapier integration allows you to connect BubblaV conversations to thousands of apps like Slack, HubSpot, Google Sheets, and more. Automate your support workflows without writing code.
Zapier integration requires a **Pro plan or higher**.
### What You Can Do
Start Zaps when conversations begin, messages arrive, visitors arrive, handoffs occur, meetings are booked, and more.
Send messages, ask chatbot questions, send greetings, create tickets, update customer data, and tag conversations from any app.
Look up conversations, customers, and analytics data to use in your workflows.
Connect to Slack, HubSpot, Salesforce, Gmail, Google Sheets, and thousands more.
***
## Prerequisites
Before setting up Zapier integration:
1. **BubblaV Account**: Pro plan or higher
2. **Zapier Account**: Free or paid (Zapier task limits apply)
3. **Website**: At least one website configured in BubblaV
***
## Setup Guide
Go to [BubblaV Zapier app](https://zapier.com/developer/public-invite/234736/47c810a5dab97e1379d5f33cdd17e7b7/) and click **Accept Invite**.
Go to [zapier.com](https://zapier.com) and click **Create Zap**.
In the trigger app search, type **BubblaV** and select it.
Select the trigger event you want to use (e.g., New Conversation, New Message).
Click **Sign in** and you'll be redirected to BubblaV for OAuth authorization.
Sign in to your BubblaV account and authorize Zapier to access your data.
Choose which BubblaV website to connect (if you have multiple).
Add actions from other apps and turn on your Zap.
***
## Available Triggers
BubblaV provides 12 triggers across 4 categories:
### Conversation Triggers
| Trigger | Description |
| ----------------------- | ------------------------------------------------- |
| **New Conversation** | Fires when a visitor starts a new chat |
| **New Message** | Fires when any message is received |
| **Handoff Requested** | Fires when AI escalates or visitor requests human |
| **Conversation Closed** | Fires when a conversation ends |
| **Conversation Rated** | Fires when customer provides feedback rating |
| **Lead Captured** | Fires when visitor submits contact information |
### Visitor Tracking Triggers
| Trigger | Description |
| ---------------- | ------------------------------------------------------------- |
| **New Visitor** | Fires when a new visitor starts their first conversation |
| **Return Visit** | Fires when a known customer (with email) returns to your site |
Visitor tracking triggers help you identify new prospects and re-engage returning customers automatically.
### Event Triggers
| Trigger | Description |
| ---------------- | ------------------------------------------------ |
| **Link Clicked** | Fires when visitor clicks a link in conversation |
### Calendly Triggers
| Trigger | Description |
| ----------------------- | ------------------------------------------- |
| **Meeting Booked** | Fires when visitor books a Calendly meeting |
| **Meeting Cancelled** | Fires when a scheduled meeting is cancelled |
| **Meeting Rescheduled** | Fires when meeting time is changed |
All triggers fire instantly via webhooks (no polling delay).
***
## Available Actions
| Action | Description |
| -------------------------- | --------------------------------------------------------------------------------------------- |
| **Send Message** | Post a message to an active conversation |
| **Ask Chatbot a Question** | Ask your AI chatbot a question and receive an intelligent answer based on your knowledge base |
| **Create Ticket** | Create a support ticket via Zendesk integration |
| **Update Customer** | Update visitor metadata with external data |
| **Tag Conversation** | Add tags for categorization and reporting |
| **Send Greeting** | Display a transient greeting message to online visitors |
***
## Available Searches
| Search | Description |
| --------------------- | ---------------------------------- |
| **Find Conversation** | Look up by ID or visitor email |
| **Find Customer** | Search customers by email |
| **Get Analytics** | Retrieve website analytics summary |
***
## Example Workflows
### Example 1: Slack Notifications for New Conversations
Get instant Slack alerts when visitors start chatting.
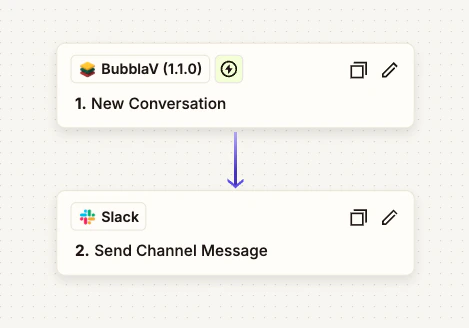 In Zapier, click **Create Zap**.
Select **BubblaV** as the trigger app, then choose **New Conversation**.
Select your connected BubblaV account and choose the website.
Add a Slack action: **Send Channel Message**.
Set the channel and format the message:
```
New chat from {{visitor_email}}
Page: {{page_url}}
Started: {{started_at}}
```
Test the Zap and turn it on.
### Example 2: Log Conversations to Google Sheets
Track all conversations in a spreadsheet for analysis.
In Zapier, click **Create Zap**.
Select **BubblaV** as the trigger app, then choose **New Conversation**.
Select your connected BubblaV account and choose the website.
Add a Slack action: **Send Channel Message**.
Set the channel and format the message:
```
New chat from {{visitor_email}}
Page: {{page_url}}
Started: {{started_at}}
```
Test the Zap and turn it on.
### Example 2: Log Conversations to Google Sheets
Track all conversations in a spreadsheet for analysis.
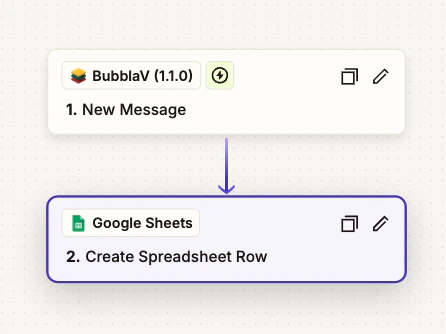 In Zapier, click **Create Zap**.
Select **BubblaV** > **New Message** as the trigger.
Select your BubblaV account and website.
Add action: **Google Sheets > Create Spreadsheet Row**.
Map BubblaV fields to spreadsheet columns:
* Column A: `{{conversation_id}}`
* Column B: `{{message_content}}`
* Column C: `{{sender_type}}`
* Column D: `{{created_at}}`
Test the Zap and turn it on.
### Example 3: Welcome Email for First-Time Visitors
Automatically send a personalized welcome email when someone visits your site for the first time.
In Zapier, click **Create Zap**.
Select **BubblaV** > **New Message** as the trigger.
Select your BubblaV account and website.
Add action: **Google Sheets > Create Spreadsheet Row**.
Map BubblaV fields to spreadsheet columns:
* Column A: `{{conversation_id}}`
* Column B: `{{message_content}}`
* Column C: `{{sender_type}}`
* Column D: `{{created_at}}`
Test the Zap and turn it on.
### Example 3: Welcome Email for First-Time Visitors
Automatically send a personalized welcome email when someone visits your site for the first time.
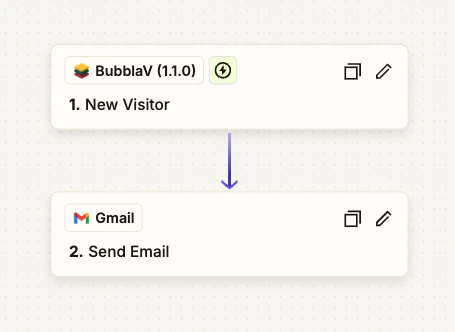 In Zapier, click **Create Zap**.
Select **BubblaV** as the trigger app, then choose **New Visitor**.
Select your connected BubblaV account and choose the website.
Add an email action (Gmail, Mailchimp, SendGrid, etc.): **Send Email**.
Set up the welcome email:
```
Subject: Welcome to [Your Company]!
Body:
Hi there!
Thanks for visiting our website. We noticed you started a conversation
and we'd love to help you get started.
[Your welcome message and next steps]
```
Test the Zap and turn it on.
### Example 4: Re-engagement Campaign for Returning Customers
Trigger a personalized campaign when known customers return to your site.
In Zapier, click **Create Zap**.
Select **BubblaV** as the trigger app, then choose **New Visitor**.
Select your connected BubblaV account and choose the website.
Add an email action (Gmail, Mailchimp, SendGrid, etc.): **Send Email**.
Set up the welcome email:
```
Subject: Welcome to [Your Company]!
Body:
Hi there!
Thanks for visiting our website. We noticed you started a conversation
and we'd love to help you get started.
[Your welcome message and next steps]
```
Test the Zap and turn it on.
### Example 4: Re-engagement Campaign for Returning Customers
Trigger a personalized campaign when known customers return to your site.
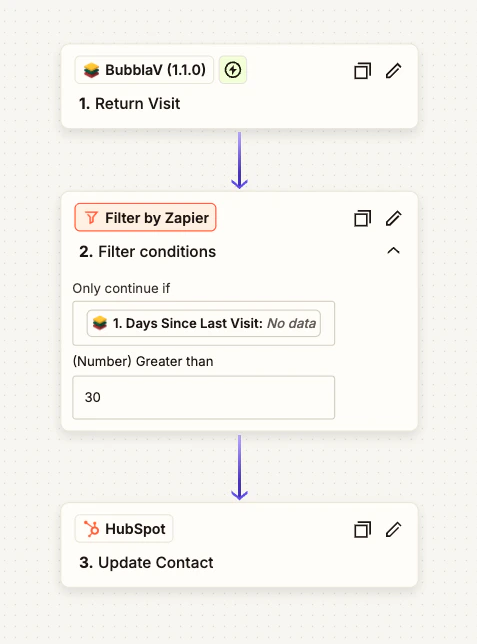 In Zapier, click **Create Zap**.
Select **BubblaV** > **Return Visit** as the trigger.
Select your BubblaV account and website.
Add a filter to only trigger for customers who haven't visited in 30+ days:
```
Days Since Last Visit > 30
```
Add action: **HubSpot > Update Contact** or your CRM of choice.
Update the contact with:
* Last Visit Date: `{{current_visit_at}}`
* Total Conversations: `{{previous_conversation_count}}`
* Add tag: "Recently Re-engaged"
Test the Zap and turn it on.
### Example 5: Proactive Greeting for Return Visitors
Welcome returning visitors with a personalized message or special offer.
In Zapier, click **Create Zap**.
Select **BubblaV** > **Return Visit** as the trigger.
Select your BubblaV account and website.
Add a filter to only trigger for customers who haven't visited in 30+ days:
```
Days Since Last Visit > 30
```
Add action: **HubSpot > Update Contact** or your CRM of choice.
Update the contact with:
* Last Visit Date: `{{current_visit_at}}`
* Total Conversations: `{{previous_conversation_count}}`
* Add tag: "Recently Re-engaged"
Test the Zap and turn it on.
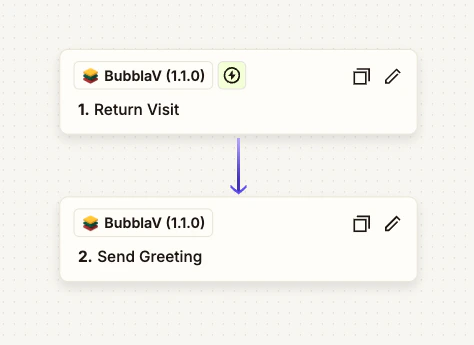
### Example 5: Proactive Greeting for Return Visitors
Welcome returning visitors with a personalized message or special offer.
 In Zapier, click **Create Zap**.
Select **BubblaV** > **Return Visit** as the trigger.
Select your BubblaV account and website.
Add action: **BubblaV > Send Greeting**.
Set the message to show:
* Visitor ID: `{{visitor_id}}`
* Message: "Welcome back! Here is a 10% discount code: RETURN10"
Test the Zap and turn it on.
### Example 6: Auto-Generate Support Responses with AI
Automatically generate personalized support responses using your chatbot's knowledge base when a support ticket is created.
In Zapier, click **Create Zap**.
Select **BubblaV** > **Return Visit** as the trigger.
Select your BubblaV account and website.
Add action: **BubblaV > Send Greeting**.
Set the message to show:
* Visitor ID: `{{visitor_id}}`
* Message: "Welcome back! Here is a 10% discount code: RETURN10"
Test the Zap and turn it on.
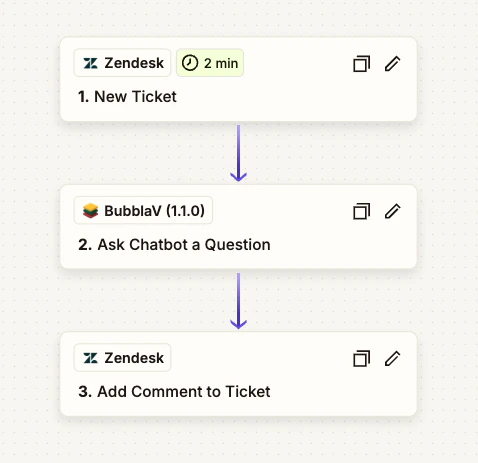
### Example 6: Auto-Generate Support Responses with AI
Automatically generate personalized support responses using your chatbot's knowledge base when a support ticket is created.
 In Zapier, click **Create Zap**.
Select your helpdesk app as the trigger (e.g., **Zendesk > New Ticket** or **Freshdesk > New Ticket**).
Select your helpdesk account and configure the trigger.
Add action: **BubblaV > Ask Chatbot a Question**.
Map the fields:
* Question: `{{ticket_subject}}` or `{{ticket_description}}`
* Context: "This is a support ticket from `{{customer_name}}` (`{{customer_email}}`). Previous tickets: `{{previous_tickets_count}}`"
* Tone: "professional and empathetic"
Add another action: **Zendesk > Add Comment to Ticket** (or your helpdesk app).
In the comment field, insert the AI-generated answer:
```
{{answer}}
---
This response was generated by our AI assistant.
Please review before sending to the customer.
```
Test the Zap and turn it on.
This workflow helps support teams generate draft responses faster while maintaining context and tone consistency.
Each question asked via the "Ask Chatbot a Question" action counts toward your monthly message quota. Plan limits apply.
***
## Troubleshooting
Zapier integration requires Pro plan or higher. Upgrade your BubblaV plan in Dashboard > Billing.
1. Verify your Zap is turned ON in Zapier
2. Check that the website is correct
3. Test the trigger manually in Zapier
4. Review Zapier task history for errors
Ensure the conversation ID is valid and the conversation is still active. Closed conversations cannot receive new messages.
You've exceeded your monthly message quota. The Ask Question action counts toward your plan's message limit. Upgrade your plan or purchase extra messages in Dashboard > Billing.
Go to Dashboard > Integrations, find Zapier, and click **Disconnect**. This will revoke access and stop all Zaps.
***
## FAQ
No, BubblaV does not limit Zapier tasks. Your Zapier plan determines task limits.
Yes, you can connect Zapier to each website separately. Each connection is independent.
BubblaV uses instant webhooks (REST Hooks). Triggers fire immediately when events occur.
Conversation data, message content, visitor metadata, and timestamps. No payment or password data is ever sent.
***
## Related Guides
* [Overview of Integrations](/user-guide/integrations/overview)
* [Custom Tools](/user-guide/integrations/custom-tools)
* [Live Support](/user-guide/live-support/overview)
In Zapier, click **Create Zap**.
Select your helpdesk app as the trigger (e.g., **Zendesk > New Ticket** or **Freshdesk > New Ticket**).
Select your helpdesk account and configure the trigger.
Add action: **BubblaV > Ask Chatbot a Question**.
Map the fields:
* Question: `{{ticket_subject}}` or `{{ticket_description}}`
* Context: "This is a support ticket from `{{customer_name}}` (`{{customer_email}}`). Previous tickets: `{{previous_tickets_count}}`"
* Tone: "professional and empathetic"
Add another action: **Zendesk > Add Comment to Ticket** (or your helpdesk app).
In the comment field, insert the AI-generated answer:
```
{{answer}}
---
This response was generated by our AI assistant.
Please review before sending to the customer.
```
Test the Zap and turn it on.
This workflow helps support teams generate draft responses faster while maintaining context and tone consistency.
Each question asked via the "Ask Chatbot a Question" action counts toward your monthly message quota. Plan limits apply.
***
## Troubleshooting
Zapier integration requires Pro plan or higher. Upgrade your BubblaV plan in Dashboard > Billing.
1. Verify your Zap is turned ON in Zapier
2. Check that the website is correct
3. Test the trigger manually in Zapier
4. Review Zapier task history for errors
Ensure the conversation ID is valid and the conversation is still active. Closed conversations cannot receive new messages.
You've exceeded your monthly message quota. The Ask Question action counts toward your plan's message limit. Upgrade your plan or purchase extra messages in Dashboard > Billing.
Go to Dashboard > Integrations, find Zapier, and click **Disconnect**. This will revoke access and stop all Zaps.
***
## FAQ
No, BubblaV does not limit Zapier tasks. Your Zapier plan determines task limits.
Yes, you can connect Zapier to each website separately. Each connection is independent.
BubblaV uses instant webhooks (REST Hooks). Triggers fire immediately when events occur.
Conversation data, message content, visitor metadata, and timestamps. No payment or password data is ever sent.
***
## Related Guides
* [Overview of Integrations](/user-guide/integrations/overview)
* [Custom Tools](/user-guide/integrations/custom-tools)
* [Live Support](/user-guide/live-support/overview)