
The Conversation Queue
Views
Access different views to manage your workload:Filters
Filter conversations by status:Sorting
Sort conversations by:- Newest first: Most recent conversations at the top
- Oldest first: Oldest conversations at the top
- Unread first: Conversations with unread messages prioritized
Joining a Conversation
1
Select a Conversation
Click on a conversation in the queue on the left side. Unread conversations show a blue indicator with the unread count.
2
Review History
Read the conversation so far in the main chat area. See what the customer asked and how the bot responded.
3
Join the Conversation
When you start typing a message in the input box at the bottom, the conversation automatically switches to human interaction mode. The bot is paused and you can chat directly with the customer.
4
Respond
Type your message and press Enter or click Send. Your messages appear on the right side with your name, while customer messages appear on the left.
What the Customer Sees
When you join a conversation:- The typing indicator shows you’re responding
- Your messages appear like normal chat messages
- The conversation seamlessly transitions from bot to human agent
The Chat Interface
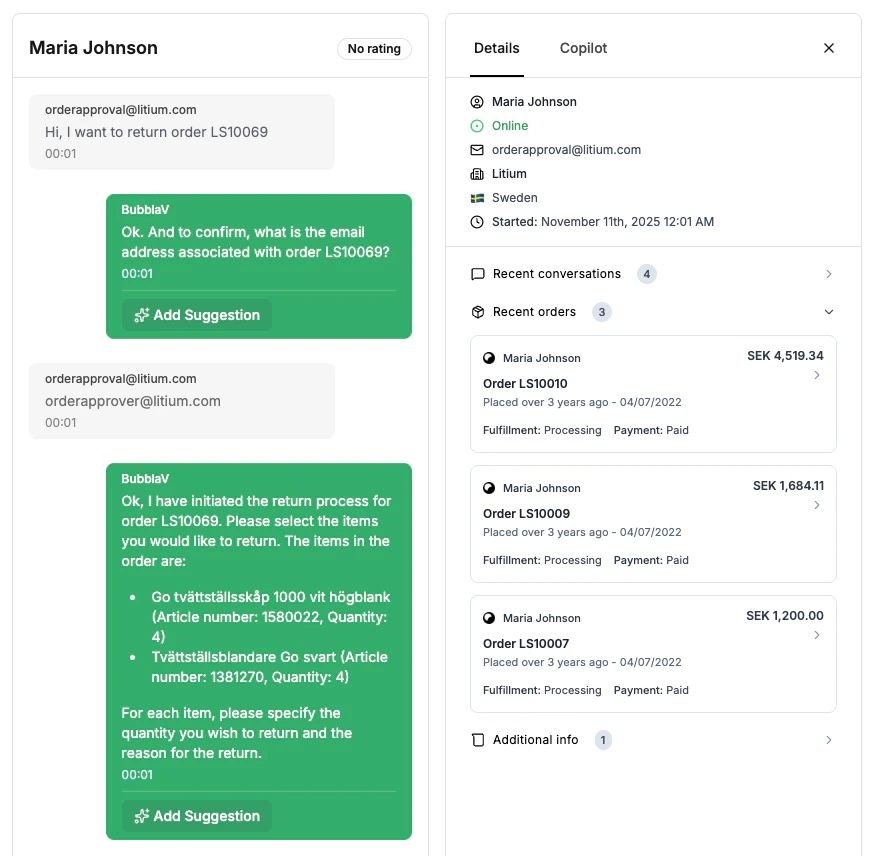
Message Area
- Customer messages: Left side, with timestamp
- Bot messages: Right side, labeled “AI”
- Your messages: Right side, labeled with your name
Input Area
- Text box: Type your message
- Send button: Or press Enter. The button also remembers your last choice — see Send & Archive / Send & Wait below
- Attachment button: Send files or images (coming soon)
Customer Info Panel
The right sidebar shows customer insights and context. Click the info icon to view: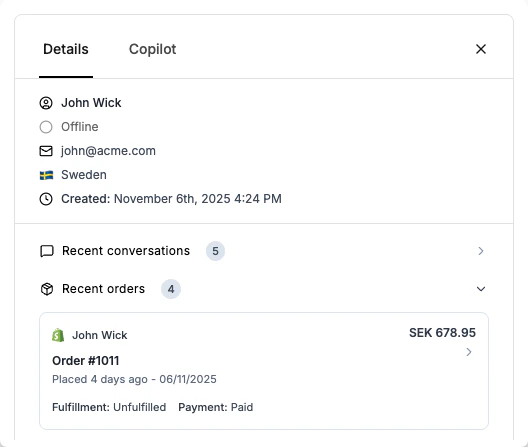
Integration Context
If you have integrations connected, see relevant customer data:Shopify Data
- Recent orders with status
- Order totals and items
- Customer lifetime value
- Previous support interactions
Calendly Data
- Upcoming appointments
- Past meetings
- Booking history
Zendesk Data
- Open tickets
- Previous tickets
- Support history
Managing Conversations
Managing Your Inbox
Keep a busy inbox under control with these tools:- Status tabs: switch the list between Open, Waiting, and Archived using the segmented control above the conversation list. The Open tab (default) shows only conversations that need your attention.
- Waiting: mark a conversation as waiting on customer after you reply — it moves out of the Open view and comes back automatically as soon as the customer replies (from any channel). Mark items as waiting from the clock icon in the chat header, the bulk action bar, or with the Send & Wait button.
- Archive: for conversations that are finished — or that you never want to see again, like spam. Archived items move to the Archived tab and stay there: if the customer (or a spammer) replies anyway, the message is stored silently — unread in the Archived tab, with no notification and nothing reopening. Use Waiting instead when you do expect a reply.
- One-click triage: archiving or marking waiting from the chat header (or pressing
E/W) jumps straight to the next conversation in the list, so clearing your inbox takes one click per item instead of three. These moves are silent — no toast — the list and the next conversation speak for themselves. - Bulk select: select multiple conversations and archive them or mark them as waiting in a single action. Archiving from the Waiting tab also clears the waiting state. In the Archived tab the bulk actions become Restore (moves items back to Open) and Waiting. Switching tabs clears the selection.
- Pin to top: pin important conversations so they stay at the top of the list for your whole team.
- Filter by channel: narrow the list to a single channel — for example, filter to Email to focus on support emails.
Send & Archive / Send & Wait
Replying to a ticket usually means it’s handled — so why click three times? The send button is a split button:- Click the main button to send with your default action (Send, Send & Archive, or Send & Wait).
- Click the chevron next to it to choose a different action for this reply. Your choice becomes the new default, so one click is all you need next time.
After sending, you’re taken straight to the next conversation in the list.
Proactive Conversations
You can start conversations with visitors before they reach out to you:- Go to Live Support → Online Visitors
- Find a visitor you want to engage
- Click Start Live Chat
- Send your greeting message
Hand Over to Bot
When the issue is resolved, you can hand the conversation back to the bot:1
Confirm Resolution
Make sure the customer’s issue is fully addressed
2
Hand Over to Bot
Click Hand Over to Bot to return the conversation to AI mode. The bot will handle future messages from this customer.
When you hand over to the bot, the conversation state changes from “human_interaction” back to “bot”. The customer can continue chatting with the AI.
When you reply to a visitor’s message, they will receive an email notification after 5 minutes if they haven’t returned to the conversation. This ensures they never miss your response. Configure email notifications →
Real-time Updates
The Live Support dashboard updates in real-time:- New messages: Appear instantly as customers send them
- Unread indicators: Blue badges show unread message counts
- Online status: Green dot indicates when a visitor is currently online
- Conversation list: Automatically refreshes when new conversations start
Best Practices
Greet personally
Greet personally
Start with a friendly greeting using their name if available.
Acknowledge the issue
Acknowledge the issue
Summarize their problem to show you understand before solving it.
Use customer context
Use customer context
Reference their order, page, or history to personalize the response.
Be concise
Be concise
Keep messages short and scannable. Break long responses into multiple messages.
Confirm resolution
Confirm resolution
Ask “Is there anything else I can help with?” before closing.
Keyboard Shortcuts
|
Esc | Close current chat |
Troubleshooting
Messages not sending
Messages not sending
- Check your internet connection
- Refresh the page
- Verify you’ve claimed the conversation
Can't see customer info
Can't see customer info
- Customer info appears after they provide it
- Integration data requires connected accounts
Conversation disappeared
Conversation disappeared
- Check the Waiting and Archived tabs
- Another agent may have claimed or archived it
Next Steps
AI Copilot
Get AI-powered response suggestions
Reports
View conversation analytics